Visual Studio Team Services Build and Release Management with Multiple Configurations
One of my most frequent issues when releasing to Azure websites using the old build system from VSTS/VSO is the deployment fails. By old build system, I mean the continuous deployment magic you set up from the Azure portal for an Azure website (now App Service). The worst is on a good sized solution I work on which takes about 20 minutes to build. So I wait the 20 minutes, only for it to fail for reasons beyond my control on the deployment step with errors like "invalid thumbprint" or "intermittent communications issues." Despite the build succeeding, I'm left kicking a new build and waiting 20 minutes just for the deployment. So I was really excited to see the new Build and Release Management system in VSTS/VSO where it looks that option is possible, retrying just that deployment step. On the solution with the 20 minute build time, there are also four different configurations. (This means there's potentially 80 minutes of wasted build time if the deploy fails for all.) The new build and release system also looks to have a multi-configuration option where I can build all four at once.
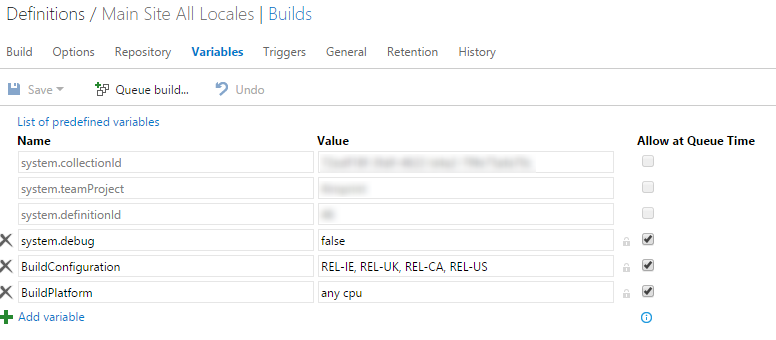
So diving into the main getting started tutorial, it looks very promising. First thing is to set up the build. I'm following the tutorial exactly as shown by creating a Visual Studio build, but with three small additional steps in order to cope with building all four of my configurations. On the variables tab, I replaced the existing build configuration values with my four configurations, separating each with a comma. If you save and queue a build at this point, it will fail, as it treats the value as a single configuration.

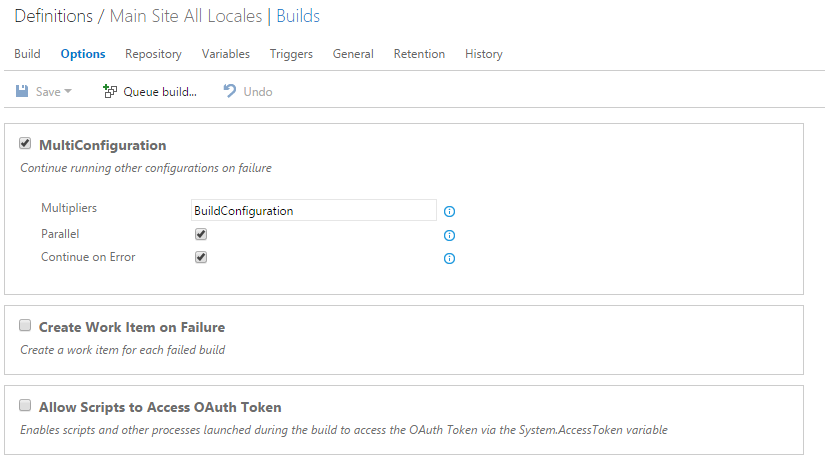
The next piece for multiple configurations is on theOptions tab. (This has changed, see edit under the image below.) Put a check next to MultiConfiguration, and set Multipliers to "BuildConfiguration". You can optionally choose to check the options below, as I have, to potentially build in parallel and continue with other build configurations if one fails.
*Edit 2018-02-01: Microsoft moved this when multi-phase builds released. This can be enabled now in the Tasks tab by selecting the Phase. I believe this defaults to Phase 1 for both new and converted legacy builds. It's the third in the list and not obvious that it can be clicked, under Process and Get Sources. From there, it's under Execution Plan > Parallelism. The Multipliers field is still the same, but there's now an additional required field, Maximum Number of Agents. Using 1 will force each configuration to finish building before the next one begins, but you can increase it and it might build in parallel.
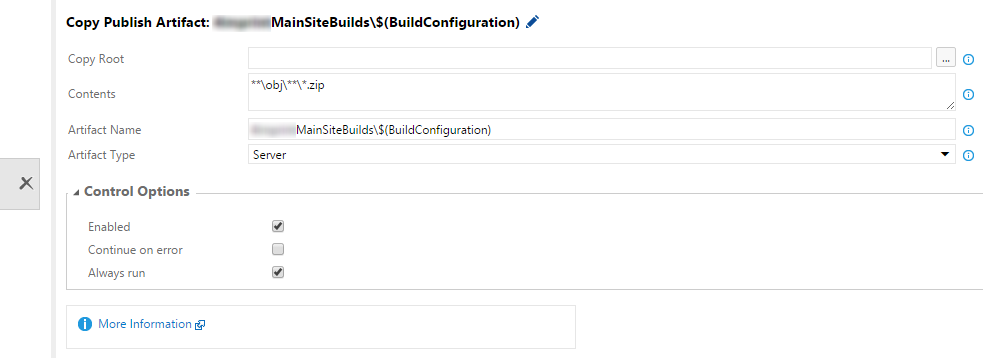
The final piece is on the Build tab, selecting the Copy and Publish Build Artifacts step. If you were to build now, it would build all four configurations, but drop all four zip files in the same directory, which isn't going to work since they'll all have the same name. My solution is to put each in their own folder, naming the folder for the configuration. This is very easy to do, just add "\$(BuildConfiguration)" (without quotes) after the artifact name in the Artifact Name textbox. Now it's safe to save and queue a build!
Interestingly, my build times decreased to around 14-15 minutes for each configuration. I'm pretty sure the deployment step wasn't taking 5 minutes on the old setup, but regardless, I like anything which makes the build faster!
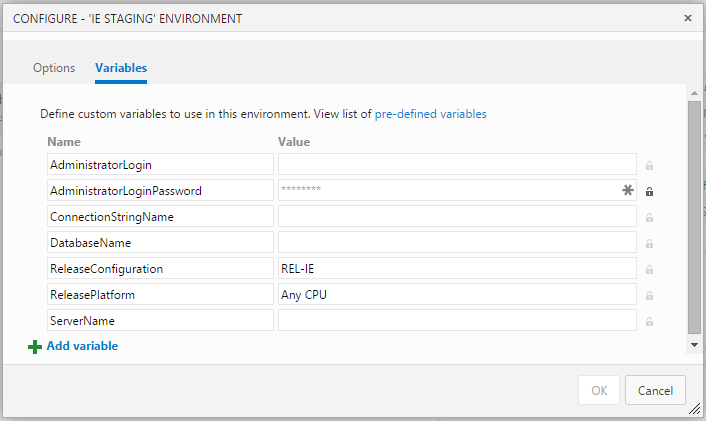
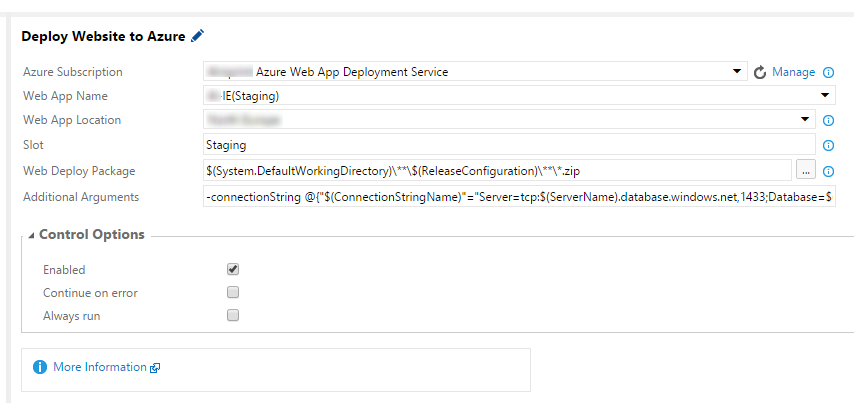
If you switch over to the Release tab from the top row now, I've followed the tutorial down to the step where you create the release definition. I've created an Azure Website Deployment, disabled the test step, and renamed the environment to match one of my build configurations. I have four configurations, so I'll need four environments. I'll come back and add those in after I get the first one right. Continuing on the tutorial, I also linked to the build definition I created earlier. Once that's done, you can see the artifact name from your build in the Artifacts tab. Back on the Environments tab, we need to line up the configuration name for the release. Click on the three dots to the right of the environment name and select Configure Variables. Next to Release Configuration, I'll set the value to match the first entry in the build configuration list in the first image above, REL-IE.
Hit OK to save and return to the environments. There is a slight adjustment needed to the Web Deploy Package value in order to grab the correct deployment package for the current configuration. The default value of "$(System.DefaultWorkingDirectory)\**\*.zip" will grab all of the zip files in the build artifacts location. I have four configurations, so there are four zip files, each within a folder named for their build configuration. Using a syntax similar to the build step, modify this to look for this configuration folder using the ReleaseConfiguration variable we just set. This will make the value "$(System.DefaultWorkingDirectory)\**\$(ReleaseConfiguration)\**\*.zip". I have a staging slot set up for this web site/app service, so I've also set variables for the release to go to that slot as well.
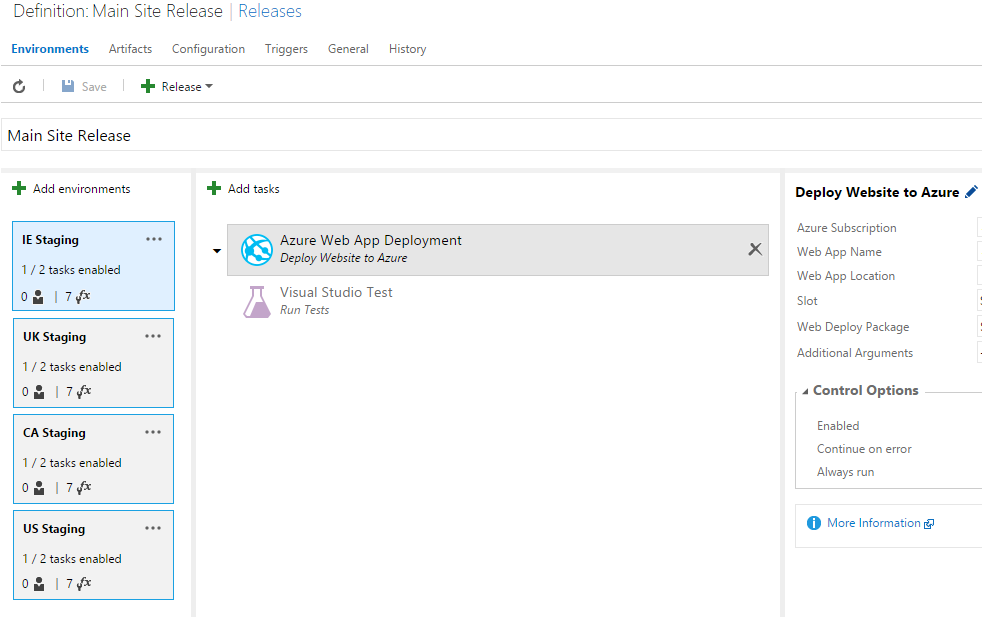
Check the tutorial again for additional steps for continuous deployment and such. Otherwise, save and run a release - it should be good to go! The first time I tried mine, it failed for no logical reason, much like the old release system. Retried it and it worked, proving that I now have an improved way to release. Now we need to copy the existing environment over for the remaining three build configurations. The easiest way to do this is by clicking the three dots to the right of the environment name, and select Clone Environment. It will copy everything from the existing environment and let you change the name right away. The two things which need to updated now will be the ReleaseConfiguration variable value and the Web App Name for each. (If your sites are in different data centers, you may need to update the Web App Location value as well.) So I cloned the first configuration three times, updated those values, and saved, resulting in something like this:
Now select the release option from the menu, select the build which you queued earlier (and is hopefully done by now), and select the sites/configurations you want to deploy from left to right. My one complaint at this point is you cannot pick and choose which of the environments to deploy, you have to select them in order from left to right. Hopefully that option is added in the future. After selecting all of the configurations, mine worked on the first try, taking a little over 8 minutes.
To workaround the drawback around selecting a release out of order I mentioned above, I've also created individual releases for each of my build configurations in the event I need to deploy just one or two of them. All in all though, I'm really happy with how this turned out. While Release Management is still technically in preview, I'll be using this in production as it's such a significant improvement in my current release experience.
So diving into the main getting started tutorial, it looks very promising. First thing is to set up the build. I'm following the tutorial exactly as shown by creating a Visual Studio build, but with three small additional steps in order to cope with building all four of my configurations. On the variables tab, I replaced the existing build configuration values with my four configurations, separating each with a comma. If you save and queue a build at this point, it will fail, as it treats the value as a single configuration.
The next piece for multiple configurations is on the
*Edit 2018-02-01: Microsoft moved this when multi-phase builds released. This can be enabled now in the Tasks tab by selecting the Phase. I believe this defaults to Phase 1 for both new and converted legacy builds. It's the third in the list and not obvious that it can be clicked, under Process and Get Sources. From there, it's under Execution Plan > Parallelism. The Multipliers field is still the same, but there's now an additional required field, Maximum Number of Agents. Using 1 will force each configuration to finish building before the next one begins, but you can increase it and it might build in parallel.
The final piece is on the Build tab, selecting the Copy and Publish Build Artifacts step. If you were to build now, it would build all four configurations, but drop all four zip files in the same directory, which isn't going to work since they'll all have the same name. My solution is to put each in their own folder, naming the folder for the configuration. This is very easy to do, just add "\$(BuildConfiguration)" (without quotes) after the artifact name in the Artifact Name textbox. Now it's safe to save and queue a build!
Interestingly, my build times decreased to around 14-15 minutes for each configuration. I'm pretty sure the deployment step wasn't taking 5 minutes on the old setup, but regardless, I like anything which makes the build faster!
If you switch over to the Release tab from the top row now, I've followed the tutorial down to the step where you create the release definition. I've created an Azure Website Deployment, disabled the test step, and renamed the environment to match one of my build configurations. I have four configurations, so I'll need four environments. I'll come back and add those in after I get the first one right. Continuing on the tutorial, I also linked to the build definition I created earlier. Once that's done, you can see the artifact name from your build in the Artifacts tab. Back on the Environments tab, we need to line up the configuration name for the release. Click on the three dots to the right of the environment name and select Configure Variables. Next to Release Configuration, I'll set the value to match the first entry in the build configuration list in the first image above, REL-IE.
Hit OK to save and return to the environments. There is a slight adjustment needed to the Web Deploy Package value in order to grab the correct deployment package for the current configuration. The default value of "$(System.DefaultWorkingDirectory)\**\*.zip" will grab all of the zip files in the build artifacts location. I have four configurations, so there are four zip files, each within a folder named for their build configuration. Using a syntax similar to the build step, modify this to look for this configuration folder using the ReleaseConfiguration variable we just set. This will make the value "$(System.DefaultWorkingDirectory)\**\$(ReleaseConfiguration)\**\*.zip". I have a staging slot set up for this web site/app service, so I've also set variables for the release to go to that slot as well.
Check the tutorial again for additional steps for continuous deployment and such. Otherwise, save and run a release - it should be good to go! The first time I tried mine, it failed for no logical reason, much like the old release system. Retried it and it worked, proving that I now have an improved way to release. Now we need to copy the existing environment over for the remaining three build configurations. The easiest way to do this is by clicking the three dots to the right of the environment name, and select Clone Environment. It will copy everything from the existing environment and let you change the name right away. The two things which need to updated now will be the ReleaseConfiguration variable value and the Web App Name for each. (If your sites are in different data centers, you may need to update the Web App Location value as well.) So I cloned the first configuration three times, updated those values, and saved, resulting in something like this:
Now select the release option from the menu, select the build which you queued earlier (and is hopefully done by now), and select the sites/configurations you want to deploy from left to right. My one complaint at this point is you cannot pick and choose which of the environments to deploy, you have to select them in order from left to right. Hopefully that option is added in the future. After selecting all of the configurations, mine worked on the first try, taking a little over 8 minutes.
To workaround the drawback around selecting a release out of order I mentioned above, I've also created individual releases for each of my build configurations in the event I need to deploy just one or two of them. All in all though, I'm really happy with how this turned out. While Release Management is still technically in preview, I'll be using this in production as it's such a significant improvement in my current release experience.


